Entra ID Security Hardening
Entra ID: Security Hardening
The purpose of this blog post is to highlight the most common vulnerabilities we encounter when doing various security assessments. These often arise because default Microsoft settings haven’t been changed or because organizations aren’t fully aware of what’s included in their purchased licenses and how to leverage them to strengthen their security.
- Insight


Entra ID licensing demystified
Before we jump into the technical stuff, let’s clear up one thing that often causes confusion:
licensing. Entra ID comes with a several of different plans, each offering something a little different. Knowing what you are working with can set you up for smooth sailing ahead. Here is the quick rundown of the most common ones:
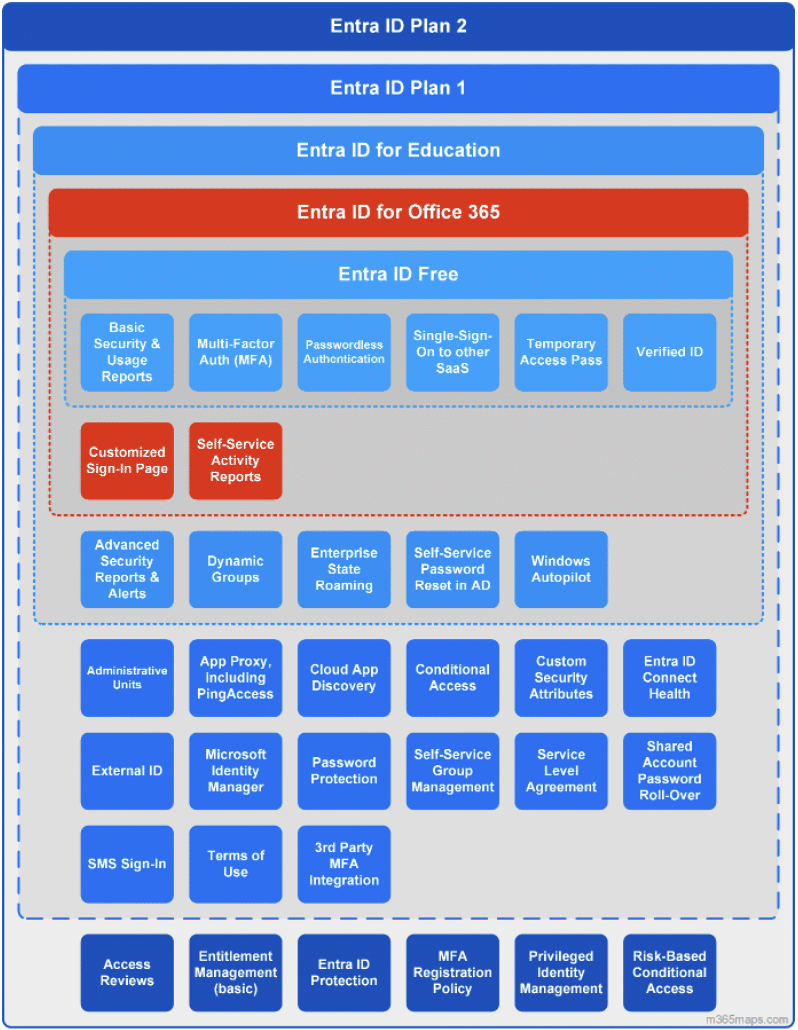
Entra ID Free
This is the starter pack you get when you first set up your tenant. Basic identity management with things like user and group management, single sign-on for some apps, and multi-factor authentication. It’s an okay start, but when it comes to security… it’s pretty much bare bones.
Entra ID P1
P1 is where things get a little more interesting. It’s included in the Microsoft 365 E3 suite and adds in great features like conditional access policies, basically, the secret sauce for zero trust. It’s essential if you want to lock down your apps and data based on user location, device health or other conditions.
Entra ID P2
This is one is for those who really want to take security to the next level. It is included in Microsoft 365 E5 or E5 Security suites and here you get access to all the bells and whistles, including Identity Protection, Risk-Based Conditional Access and Privileged Identity Management (PIM). If you are securing a larger, more complex environment or dealing with highly sensitive data, Entra ID P2 is a game-changer.
So, what do you really need?
For most organizations looking to boost their security, Entra ID P1 is usually the sweet spot. It’s got the essentials to level up your protection. At the very least, make sure all your end-users are covered with it to so you can apply conditional access. If you are ready to take things up a notch and make it even harder for threats to get through, Entra ID P2 brings in that extra crucial layer of protection. Understanding your licensing ensures you’re not leaving critical security gaps by relying on basic features that don’t provide the protection you need.
Default settings are a threat actor’s best friend
When you first set up a new Entra ID tenant, you start with Microsoft’s default settings. While they provide a basic framework, they are far from optimal when it comes to security. Threat actors are constantly looking for gaps, and a loosely configured identity platform is an open invitation for trouble.
Entra ID is the identity provider for your Microsoft 365 environment. That means if it is compromised, everything else is at risk. Strengthening your security posture isn’t just a good idea, it’s essential. Fortunately, with a few targeted improvements, you can significantly reduce attack surfaces and make life much harder for anyone trying to break in.
This blog post is all about practical security tweaks you can implement right now. No major overhauls, no complicated setup – just straightforward and effective ways to secure your environment. Let’s dive in.
Entra ID user settings
These are some of the low hanging fruits which I would recommend changing as soon as possible.
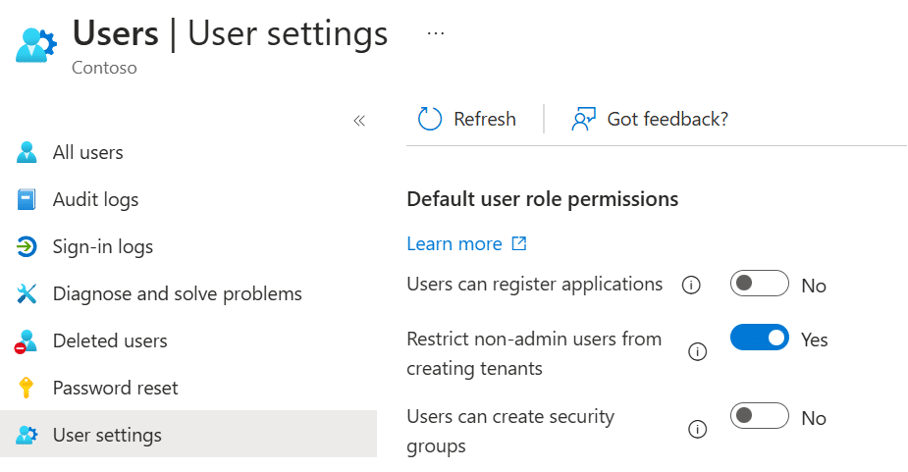
Users can register apps
By default any user in Entra ID can register their own applications in the tenant. This creates an app registration and a service principal, letting them connect to APIs or services (like Microsoft Graph) with user-consented permissions. Only administrators should be able to register applications.
Restrict non-admin users from creating tenants
Out of the box, users can create new tenants. Separate Entra ID instances, via self-service sign-ups (for instance when starting a free trial). This can lead to sprawl and the main administrator account being linked to the initial tenant. To avoid this link disabling self-service sign-ups is a good start.
Users can create security groups
Default settings let users create security groups in Entra ID. User-made groups can spiral into a mess. Think orphaned groups, over-privileged memberships, or accidental data exposure.
Restrict Access to Microsoft Entra Admin Center
By default, all users can log into the Entra admin center (entra.microsoft.com) and view information. Viewing users, groups, and applications they own or have visibility into. Regular users don’t need this level of insight. They could see more than they should (such as group memberships or application configurations) or stumble into settings that expose weaknesses. A compromised account with admin center access could map your tenant for an attack. It’s not a full admin role, but it’s still too much rope. It’s also worth noting that the Azure AD PowerShell module still provides read access, even though it is deprecated. This will remain the case until the underlying APIs are fully retired. If you’re still relying on it, now is a good time to start transitioning to Microsoft Graph PowerShell for long-term compatibility.
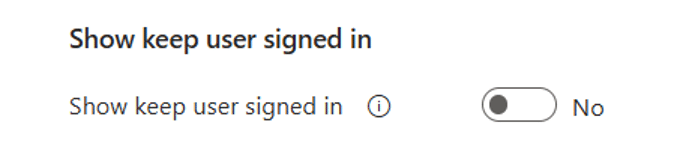
Show keep user signed in
The “Keep me signed in” option determines whether users stay logged in after closing their browser. If enabled, it creates a persistent cookie that maintains the session even after the browser is restarted. On corporate devices with SSO, this setting is redundant, but on unmanaged devices, it can pose a security risk by keeping accounts accessible indefinitely. I recommend switching this off.
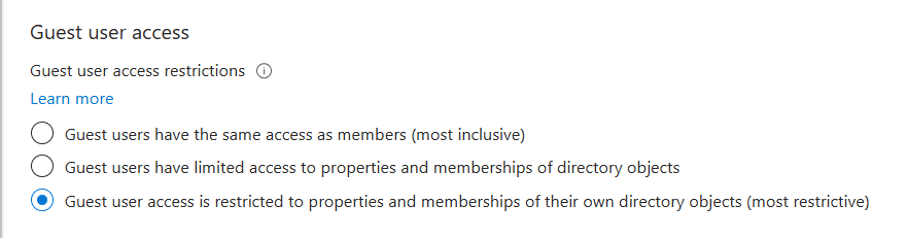
Guest user access
The default is limited access, meaning guests can see group memberships they’re in and some directory data. That’s enough for a compromised guest to scope out your tenant. Think user lists or group structures, before escalating an attack. It is recommended to switch to the most restrictive option. With the most restricted option, guests lose visibility into other users, groups, or directory objects beyond their own account.
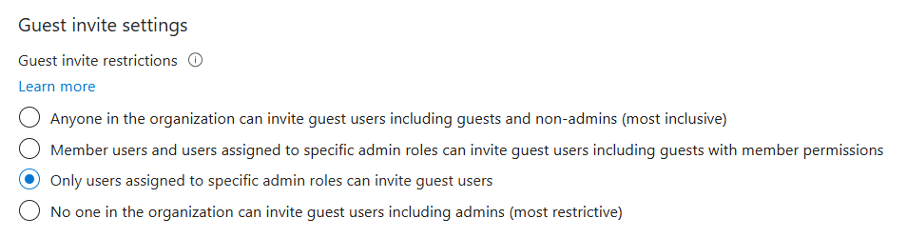
Guest invite settings
The Guest invite settings determine who can invite external users to your organization. By default, anyone in the tenant (including guests) can do this, which can quickly lead to an uncontrolled influx of external accounts. The most secure approach is to disable guest invitations entirely, or at the very least, restrict the ability to a designated security group with the Guest Inviter role. However, for organizations that depend on external collaboration, such strict limitations may not always be practical. From both a security and productivity standpoint, configuring this setting to “Members assigned to specific admin roles” is a balanced approach.
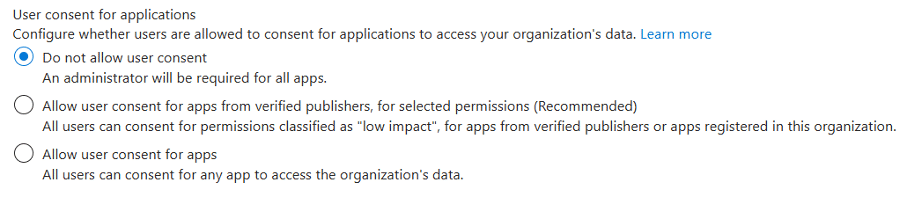
User consent for applications
By default, users can grant third-party applications permission to access their data. This can lead to data exposure, shadow IT, and even account takeovers. Attackers have historically abused this feature by tricking users into consenting to malicious OAuth apps disguised as legitimate services. However, this type of attack is less common today. Instead threat actors are increasingly leveraging legitimate third-party applications, such as CRM systems or other business tools, to gain access and misuse granted permissions.
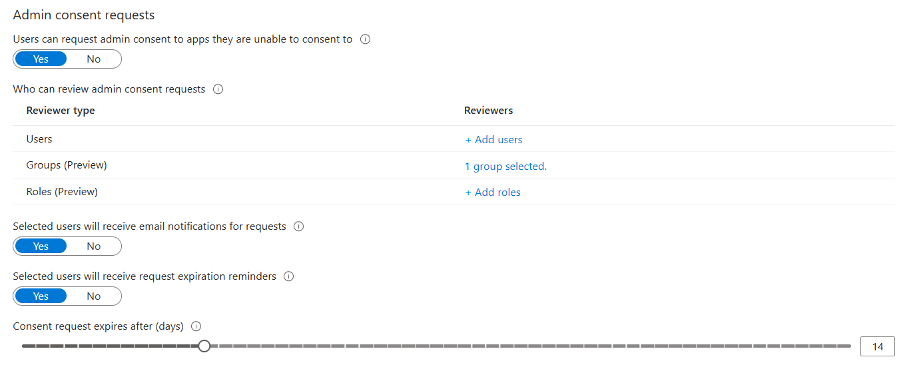
You could consider setting up an admin approval for this, which means if a user wants to connect an external app which isn’t already registered in the tenant, they can submit a request.
An admin is then notified by email and can review whether the app meets security and compliance standards before granting access.
Roles and Admins
Managing admin roles isn’t just about assigning permissions, it’s about minimizing risk and making sure the right people have just enough access to do their job, nothing more.
- Don’t use on-premises synced accounts for admin roles – they’re a liability. If your Active Directory gets hit, then attackers can use this privileged escalation path and gain access to cloud resources and vice-versa. Go with cloud-native Entra ID accounts instead. Cloud-native accounts will remove the privilege escalation path, effectively reducing your attack surface.
- Limit Global Administrators to less than five. Sufficient for backup without turning privileged access into a free-for-all.
- Skip M365-licenses that plug admin accounts into apps, data, or services. An admin account doesn’t need to be licensed.
- Set up and preferably require phishing-resistant MFA such as a Passkey.
- Implementing Privileged Access Workstations can increase the security and enforce stricter controls on where an administrative account can be used.
- Self-Service Password Reset (SSPR) might be great for regular users, but for admins? Not so much. Allowing admins to reset their own passwords creates an unnecessary security risk. If an attacker gains access to an admin’s authentication method, they could compromise a high-privilege account.
- A Temporary Access Pass is a time-limited, one-time passcode that allows users to sign in and set up a new authentication method without needing a password. Instead of relying on traditional passwords for Entra administrators, use TAP when onboarding or reboarding an admin. This ensures a secure and streamlined process, allowing them to register a phishing-resistant authentication method, such as a Passkey, right from the start.
Emergency access accounts
Emergency access accounts (also known as break-glass accounts) are your safety-line when all else fails. If your primary admins get locked out due to a misconfigured policy, MFA failure and so on, these accounts ensure you can still regain control.
- Create at least two emergency access (cloud native) accounts, separate from your normal admin accounts. These should also never be used for daily operations.
- Register FIDO2 hardware security keys for strong, phishing-resistant authentication. Store these keys in fireproof safes at two different physical locations. The PINs should only be known by a select few authorized personnel.
- Exclude from Conditional Access (CA) policies. These accounts must remain accessible under any circumstances. Place them in a security group that is excluded from all CA rules to prevent accidental lockouts.
- Restrict access with Administrative Units to limit their scope and to reduce exposure.
- Monitor activity closely. Track sign-ins and audit logs for any suspicious behavior. These accounts should never be used during normal operations, so any unexpected login attempts are a red flag.
- Test and validate regularly. An emergency account that doesn’t work when you need it isn’t much of an emergency account. Schedule periodic tests to confirm they are still functional and secure.
Privileged Identity Management
PIM, which is included in Entra ID P2, reduces risk by making admin roles eligible instead of permanently active. This means users activate roles only when they need them. Don’t overcomplicate or let this turn into a massive project. Use these guidelines to get started:
- Define scope and settings. Decide which roles to include and configure policies such as max activation time, MFA enforcement.
- Start with a pilot group. Test PIM with a small set of admins to fine-tune policies and ensure a smooth transition.
- Gradually expand rollout and extend PIM to all privileged roles, ensuring controlled adoption and monitoring impact along the way.
Conclusion
I hope that some of these recommendations help you get a stronger grip on securing your environment.